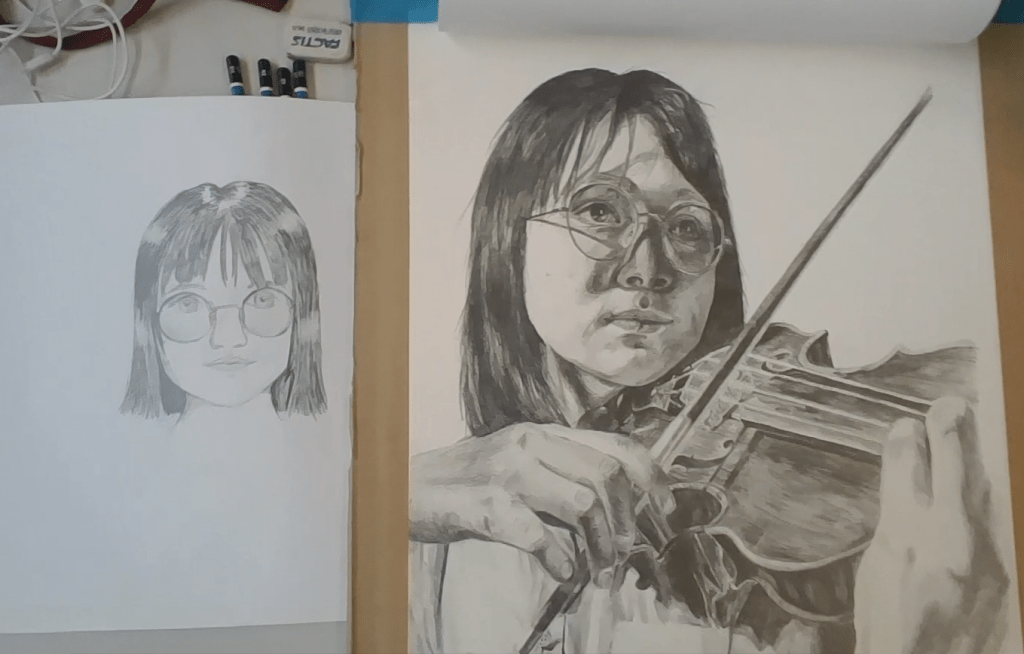
1. Evaluate your skills in drawing your self-portrait. This should be a detailed response – what were you good at, what did you struggle with…? Do you think your work is successful? Why?
In drawing my self-portrait, I think I was good at getting a diverse range of tones to match the actual variety and contrast in the photograph. This gave the portrait more depth, as well as emphasizing the detail. I managed to do this by looking carefully at the tones in the picture and comparing them to other areas, as well as thinking in both small and larger areas, in order to get small details and also larger overall details. I struggled at drawing the fabric as it was difficult to judge the locations and depths of various creases, because there were a lot of creases, and it was difficult to decide which to emphasize or how they naturally fit. I overcame this difficulty by working in small areas, and being careful to think about the shapes, rather than the objects. I think that, overall, my work was successful, as the portrait looks like me, it is a significant improvement from the first portrait that I drew at the beginning of the class, and I managed to capture many details and make a clear depth and shape in the drawing.
2. What has been the most helpful or interesting technique you have learned during Traditional Drawing?
The most helpful and interesting technique I have learned during traditional drawing is the technique of drawing shapes/lines/angles rather than objects/ parts of objects. This is especially helpful as perceived ideas of objects can often be wrong, and it is difficult to transfer them from memory. Thinking this way has been useful for me as it allows me to make a more accurate drawing, as well as adding in more detail, rather than worrying about how it would affect the object– as in the end drawing the shapes allowed me to put together the drawing in a more precise and detailed manner.
3. Write about the process in detail, from taking the photo, to transferring your drawing to the board to finishing your drawing. What choices did you make?
At the start of the process, I researched various portraits to gain inspiration for my own. I looked at the portraits of various professional artists to see their styles and their different compositions. I then decided on what I wanted to be doing in my portrait – I was allowed to use props, so I decided to be playing my violin in the photo. As none of the portraits I had looked at had people playing the violin in them, I researched some photographs of violinists to look at the various angles I could take in order to have the best angle to draw from, allowing significant detail for all parts of the drawing. I chose to have an angle front-on, with both my hands visible so that I would also be able to draw them, but without obscuring the face, and I also ensured that my eyes would be visible from the camera so that I would be able to draw them as part of the portrait. In taking the photograph, we first used a proper camera, but it turned out that the iPhone cameras had more detail in them, so we got a large variety of shots of me playing, taken in a dark room with a light, which maximised contrast. After taking the photos, I looked through them and chose a few which I thought were the best. Some of the things I considered when choosing the photo were the contrast, the detail shown, and the positioning and composition. After choosing the photo, I went onto the photos app and adjusted it so that it was in black and white, and changed the settings to maximise contrast. I then printed the photo.
After practicing drawing myself a few times on normal paper, and on a small sample of the good paper, I moved onto my proper portrait. To do this, I printed out the photo on A3 carbon paper and coloured in the back side of it with graphite pencil. I then taped it onto the good paper and traced over all the significant shapes in the photograph, including shadows, to transfer them onto the page, then took off the photo taped on. Then, I began drawing on the good paper, using the lines as guides, and focusing on the tone and texture of parts of the artwork. I started by focusing in on the details of the face, in each section that I drew starting with a lighter pencil and then progressing to a darker pencil before moving onto a different section. After finishing each significant area of the drawing (head, violin, hands, shirt), I went looked over it again to see if there were any details I had missed and changed a few things, then moved onto the next section. After finishing the drawing, I again looked over it and made a few changes to small details, and got rid of any residue.

Before (portrait drawn before any lessons) and after (final portrait from project)