Briefing
Earthquakes are huge destructive forces that can have many impacts on a city. Primarily, buildings are easily damaged during an earthquake, and are even harder to replace and rebuild. This can leave many people homeless and unprotected for long periods of time. An example is the Nepal earthquake in 2015, where 800,000 people were still living in makeshift shelters two years after the earthquake. Therefore, the importance of earthquake resistant buildings became a primary focus for civil engineers and scientists studying cities.

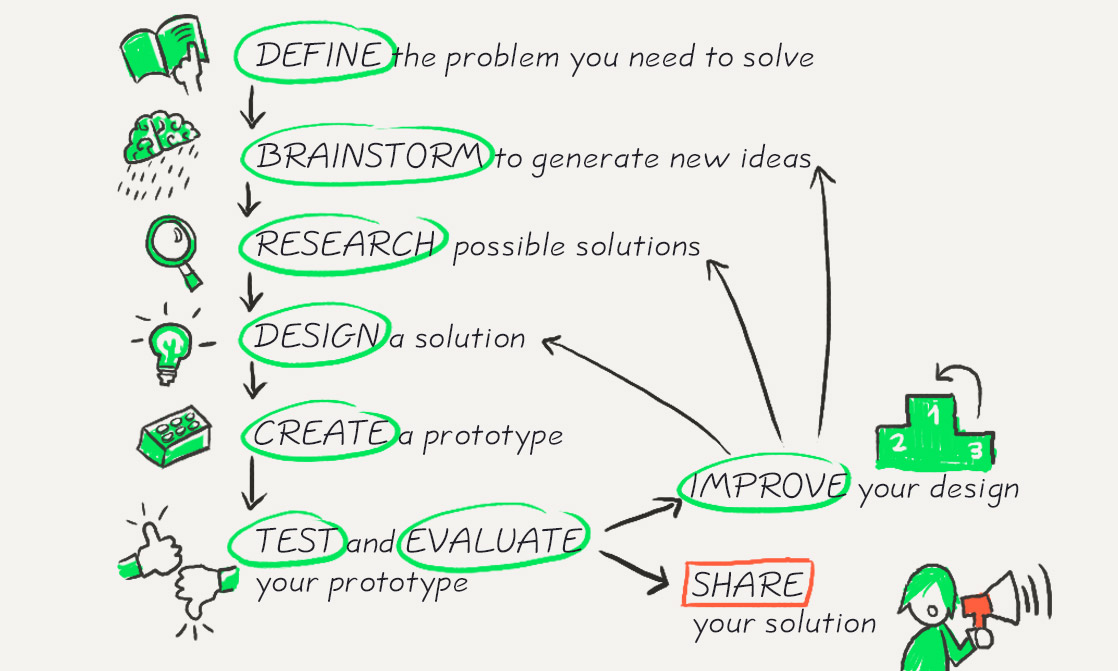
In the Year 9 Science Engineering Challenge, we were tasked with creating an earthquake resistance model of a building, all while documenting our research and following the Engineering process: Define, Research, Design, Create, Test, Evaluate.

Our Group
My team members were Tanaka Munyikwa and Sam Harban, and we were all determined to complete the challenge. We assigned each other roles based on our strengths.
Sam was the equipment manager (manages our resources and equipment), because he is strong in organisation and teamwork. Tanaka was the Speaker (person who clarifies things and documents things) because he is strong in communication and collaboration. I was the project manager (ensures the project is on track and everything runs smoothly), because I am strong in leadership and organisation.
Therefore, Tanaka would be heading the research section because he was good at finding information, while Sam would be heading the build and test section because he was the resource manager. I would be important in the define section to set the goals we needed to complete, and in the evaluate section to help steer the team into making comprehensive improvements.
We also established some ground rules:
- All decisions are resolved in a democratic way.
- We set goals and aim to complete them by the end of the day.
- If someone isn’t pulling their weight, other team members are allowed to give constructive criticism.
- Team members can give friendly suggestions on how to improve each other’s work.

Me 
Sam 
Tanaka
Defining the Challenge
Create a model of a building that is resistant to an earthquake, represented resisting the shaking of a shake table for 10 seconds with as little damage as possible. We can only use spaghetti ($1 per 10cm) and blu-tack/plasticine ($1 per gram), with the entire structure not exceeding $60. It should be at least 60cm tall and have a base no more than 30 x 30 cm. Finally, it should be quick and easy to assemble.
This challenge is important in the real world because it helps us learn about the difficulties of building earthquake-resistant cities, and the ways that they use to solve this problem while remaining cost-effective. This also helps us experience the design-thinking process and develop capabilities, project management and teamwork.
We had to identify the problems we would face in order to plan ahead for them. One of them including how brittle spaghetti was. The blu-tack might also not be strong enough to hold the joints together. The required height of the building would also be hard to reach, especially considering the budget.
Research
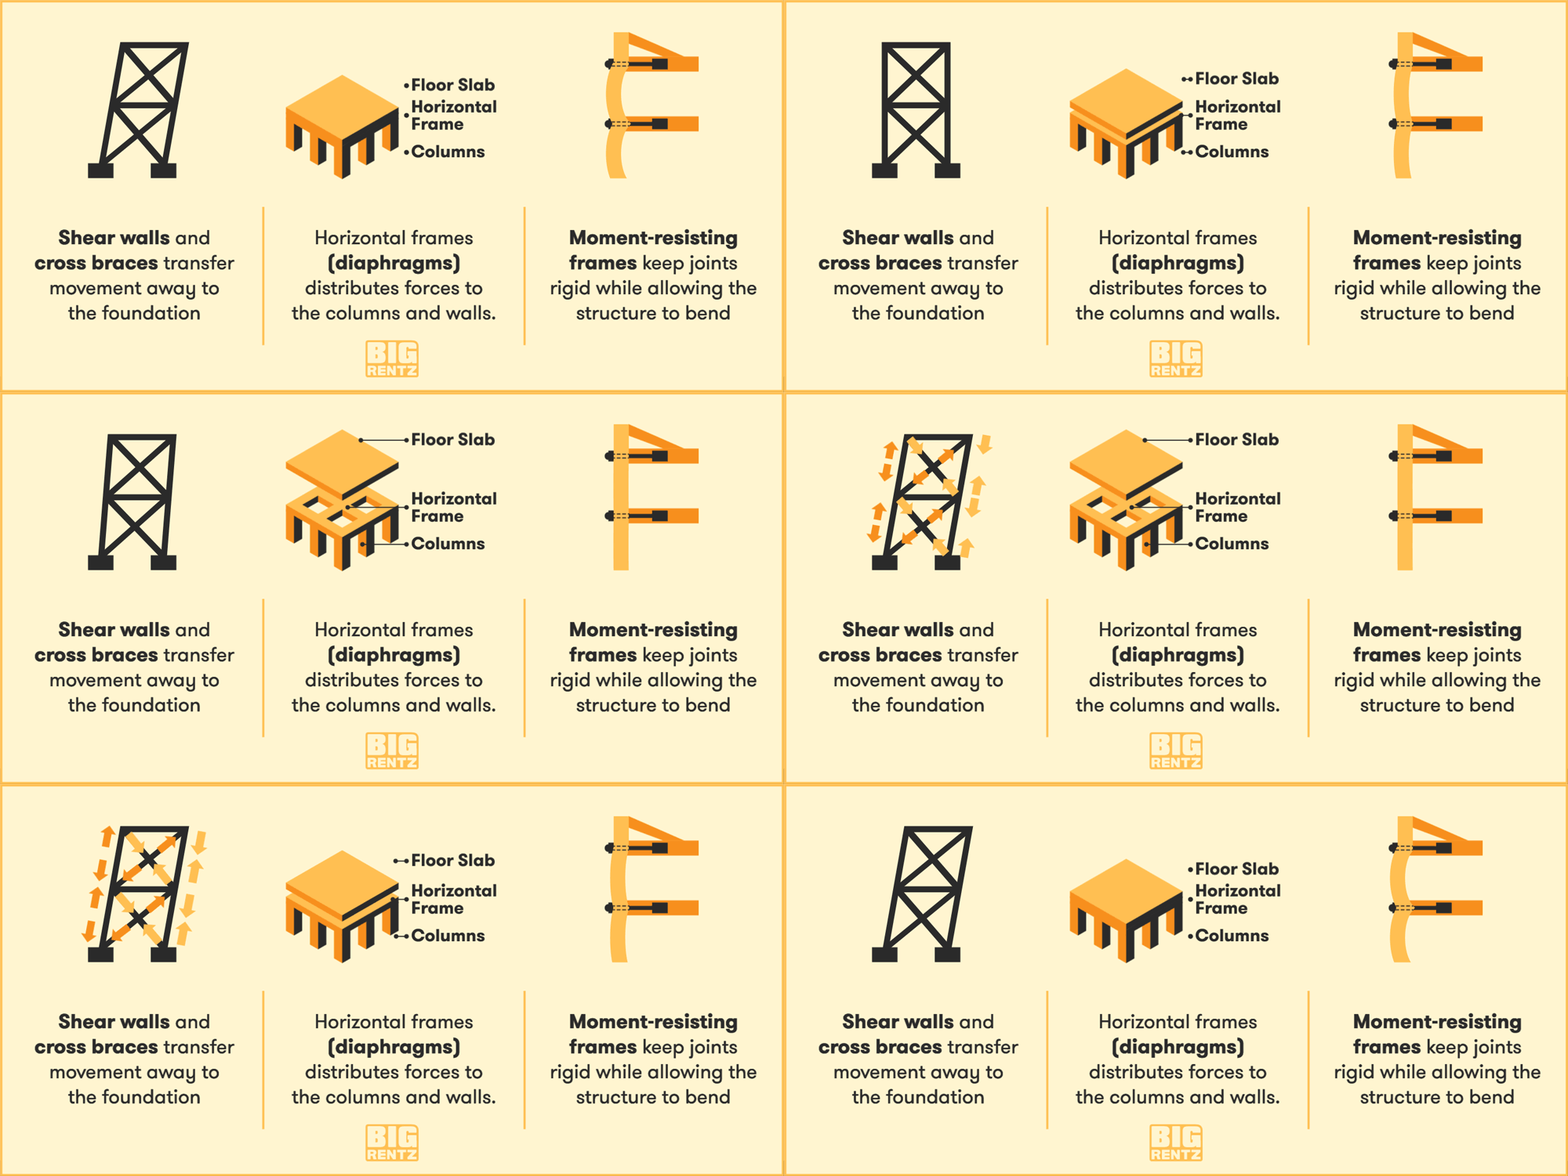
We first scoured the internet for methods used to make a real building earthquake-resistant. We researched three areas: structural additions, foundations, and materials. We learnt that the use of cross-bracing and and frames were very common, and that the triangle was the strongest shape. We also learnt that the best materials had a good balance between rigidity and flexibility. After sorting through viable options and methods, we were ready to begin designing.


Design
We discussed what methods we would implement. We then drew multiple sketches of how our building would be, before voting on which design would be best.
The main problems we faced was remaining within the budget and above the minimum height. We solved the budget problem by making our building three-sided instead of four-sided, which cut down the amount of spaghetti and blu-tack we needed to use. We solved the minimum height problem by sticking a single long strand of spaghetti at the top, which allowed us to pass the minimum height while still remaining in budget.
Our final design was shaped like a pyramid, with three sides. It also featured triangular bracing and a triangular horizontal frame.

Create
We built our model with precision and care. We carefully measured everything and found that our design was easy and quick to build, taking less than one lesson. However, patience was required, as the spaghetti sometimes snapped unexpectedly. We managed to build everything without losing our tempers. Apart from that, we had no real problems.

Test
We then tested our model using a shake table, following two types of tests. First was the “side-shake” test, where the shake table was shaken from side to side, mimicking the effects of Primary and Secondary shock waves. Then, we conducted the “smash” test, where the shake table was banged hard mimicking the effects of Surface waves, the most destructive waves.
For the first round of tests, our building suffered no damage from the “side-shake” test, withstanding a “Catastrophic” Level on the Mercalli scale.
However, it suffered a little damage during the “smash” test. Two spaghetti strands disconnected from their joints during the test, however, the building remained standing, bearing a “Catastrophic” Level earthquake on the Mercalli scale.
Evaluate
We evaluated the results of the primary test, listing the advantages and disadvantages of our building. Our building was within budget, within the required measurements, and only suffered a little damage. However, there was still room for improvement. Our building was not completely damage-proof, and came undone at the joints quite easily.
After extensive plans and proposals, we decided simplicity was key. We redistributed the blu-tack from the top half of the building to the bottom half, therefore making our foundation strong to resist forces and our top half flexible enough to not detach.
In secondary testing, we found that our building took no damage from the “side-shake” test. Most importantly, it also took no damage from the “smash test”.
Therefore, our changes were successful in creating a earthquake-resistant building.
Outcome
We had a very positive outcome to this engineering challenge. Our final building was able to resist a Mercalli XII Level (Magnitude 8) earthquake with absolutely no damage for at least 10 seconds. It survived both the “side-shake” and “smash” tests.
This was because of a good balance between rigidity and flexibility. The strong rigidity was mainly thanks to the strength of the triangular bracing and horizontal frames throughout the building. The flexibility was thanks to the variable amounts of blu-tack on joints, where the closer to the ground, the more blu-tack. This balance helped the building survive the “smash” test with no damage. A low centre of gravity and a strong solid base also made it a huge success when undergoing the “side-shake” test.
Our building was within the budget, however it could have still been cheaper. We know that the most expensive resource was blu-tack, and because we used a lot of it our building was more expensive than we wanted it to. We need to think about how we can reduce the cost without compromising effectiveness.
Our building was very easy to set up and build, taking no longer than around 30 minutes to build from scratch, with 15 minutes to fine-tune for maximum effectiveness.
Changes we could’ve made
In order to have made a more cost-effective building, more time was necessary in the create + testing stage. More time would have allowed us to trial and evaluate other methods that would have costed less, to see whether they didn’t compromise the effectiveness too much.
If we had also researched a bit more, we probably could have realised that rigidity is not the key to success, but instead a good balance, therefore allowing us to save time for other sections of the Engineering process.
Teamwork
Our teamwork was absolutely excellent. We all worked together with no arguments and we were very democratic throughout the challenge. We were also very good at working with our respective strengths.
For example, me and Sam were missing a double period because of exams and Tanaka had been sick for the past few lessons. I realised that we would be missing out a lot of time that could be used for testing and evaluating. So, I sent an email to Tanaka telling him what we had been doing and what he had to complete by the end of the double period. Therefore, we still remained on track and completed our project without delay.
Another example was Tanaka’s ability to communicate and collaborate well, allowing him to take in information and respond to it, and to also gather information for us to use. When we depended on him during exam time, he rose to the challenge and made the final version of the building. Therefore, we were able to end the project successfully.
Sam’s ability to be organised was also extremely useful. He stored our drawings and documents, ready to be used when needed. He was also very good at problem-solving and building, allowing us to create our buildings quickly and efficiently.
In reflection, our teamwork was probably what allowed us to be so successful and made the challenge so enjoyable. Having a great team is an amazing experience, and I am glad that I got to work with Sam and Tanaka.
Conclusion
Doing this project helped me learn about what goes into making buildings and the amount of thought and effort that is needed to make something earthquake-proof. I also learned about the Engineering process and why scientists and urban planners use it. Furthermore, I also had many opportunity to fine-tune my collaboration, leadership and problem-solving skills. I had heaps of fun and I hope that we can do more projects like this in the future.

haha, it broke
like you 🙂
Sunuka reply to my com
ment
no.
oh wait
suunukaaaaaaaaaaaaaaaaaaaass
nice opinion
but: 138.44.176.46
…
not kidding that’s your ip address listed on wordpress