For my year 10 electives, I chose to do contemporary printmaking for one of my classes. Throughout this time, I’ve done various print makings including, potato stamps, frottages, etching prints, and my most current, lino prints.
Out of all these prints I did, I would say the most successful prints would be either the potato stamps or the frottage as it was the easiest. For the potato stamps, we had to push the cutting stamps into the potato and cut around it to create the stamps, then stamp it into paint and then onto paper. This was an easy process for me to follow, and I ended up doing all sorts of prints such as flowers, hearts, stars, and shapes. From there, I experimented with colour, shapes, and gradient through the ghost stamps. With the frottage, I spent a period just walking around the art class room and using a blunt pencil to shade in the outlines of sharp objects, such as what I did, was the corners of tables, the bark from trees, the words on soaps and bins, and even the walls. These prints were the most successful out of all my prints and easy to play around.
My most favourite prints I did was through my etching, and my lino prints, which coincidentally was also the hardest prints I thought were. For my etching prints, I first had to:
- Find a picture to etch
- Print the photo to put under the plate
- Use the etching tools to carve into the plate (not lightly/carve deep)
- Use ink to cover the whole plate with bits of newspaper
- Take off access ink with the newspaper
- Put a damp sheet of A4 card paper through the etching machine
- Roll the plate on the same machine
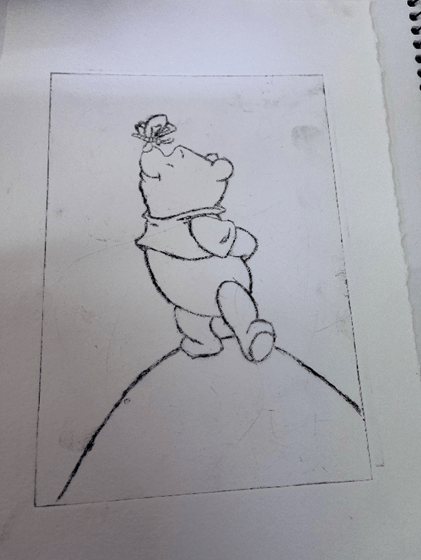
This process was difficult for me, as if I messed up any part of the etching with the tools, it was permanent. This was why we were given a test etching plate, which helped us practise for the real etching. I also struggled a bit with the etching tool, since we had to crave in deeply, my hand got blisters, but I took care of that problem by taking short breaks and shaking my hand a lot. For my practise etching, I did a little dog swimming, as it was a simple cartoon animal. For my real plate, I did winnie the pooh on a hill, because I like winnie the pooh, however it was slightly more challenging as there were more details, but this time I took more time and care and the end result turned out great!
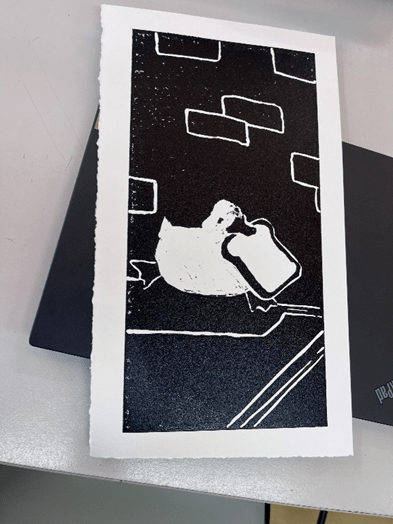
For my lino printing, the process was similar, but this time was slightly more time consuming. We first had to choose a picture to carve, the concept was that the more complicated and details the picture was, the harder it would be to carve. Just like the lino print, it was easier for me to choose simple designs, like cute, simple, cartoon animals or inanimate objects. I decided to go with a picture of a cute duckling holding a knife I found off pintrest for my practise. I first taped the carbon paper to my photo over the lino board, and used a red pen to outline the picture that went through to the lino board. From there, I used different sizes carving tools to carve out the picture. The parts carved out were the parts that would remain white. When I was done, it was time for me to do the printing. I would use the roller to get the ink onto my board a few times, and put it on paper ad press it over the press machine. My practise lino print came as this:
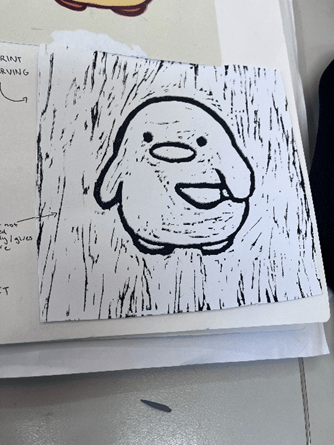

I realised that the space I carved weren’t deep enough. I then spent another lesson trying to carve out all the black, which I soon did. From my practise, I learnt the importance of carving more deeply into the board, and ensuring that I use a smaller carving tool to carefully carve around the outline I want, because as shown in my practise carving, there are some outlines that are more thicker than others. After redoing the carving, I ran into a problem, as I realised I still haven’t started my good copy and had only about over a week left. I found a decent picture of another duck off pintrest, and to not complicate things so much and to be less time consuming, this time I decided to only carve out the inside of the duck and the bread instead of being like my practise one and carving out the background too, to save time. This was the right choice for me, because the picture I chose had a lot of empty space, and in a double period, I was able to do everything at once and even did half my carving in a period. When I was done, I did the same process again in what I did in the practise one, and this time, the empty space was better but I redid the inking once, as it was poorly inked. I learnt from my mistakes and redid the inking this time with more ink, on the good paper, and the results were much more satisfying.
Overall, I was able to get every printmaking board done, and use my class time well and not get distracted, which were also my goals for this semester. My friends also greatly helped me accomplish this, as I have made mistakes like carving out my board too much and accidentally making a hole, and when my hand got cramps from etching for too long. I am glad I learnt from my mistakes in my lino print, and altogether, I think my finished prints turned out very well.