Brief Overview:
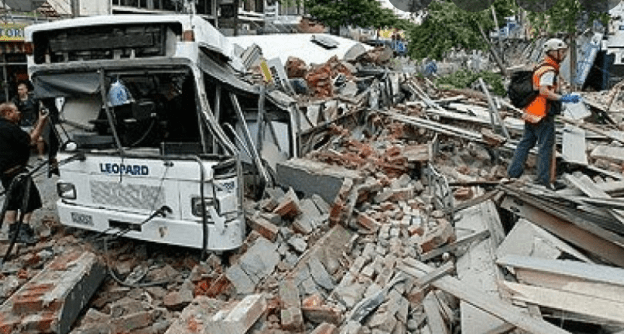
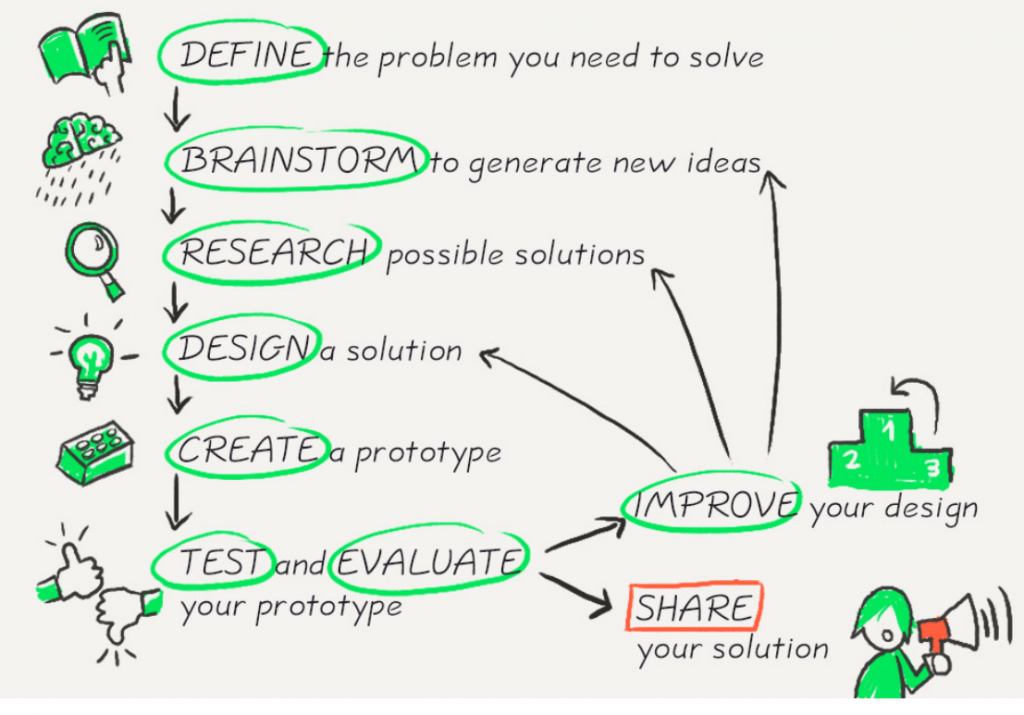
During term 4 science, our year group were tasked with an earthquake design project. This project involved the creation of an earthquake resistant structure that will be tested in a mini earthquake simulation nearing the projects end, whilst documenting our design process, and following the DRDCTE engineering process; Define, Brainstorm, Research, Design, Create and Test/Evaluate.
Group Members:
After the introduction of the project, I formed a group with 3 other classmates, Tim, Shray and Thenuk. Coming together, the 4 of us began allocating roles to each other.
Through judging each other’s strength and abilities, Tim and Shray was allocated the role of designer and researcher due to their creativity and ability to use given information and apply it to their task at hand, which in this case was designing the building structure. This coupled with the knowledge and design skills, the two learnt from wood work lessons made them perfect for the job. With his logical thinking and ability to evaluate situations/objects when given the objective/goal of the project, Thenuk was the “Reality Check”, basically the person who looks over our ideas and design, then evaluating them to see if it will be a viable option, given the limitations of the project. His contributions allowed us to single out the most effective designs and help keep on our deadlines. Finally, I was deemed builder and calculator, due to my stable hands and mathematical skills, allowing me to carefully build our building to withstand the violent earthquake simulation and also to calculate the costs of our design to ensure it is within the $60 budget.

This division of roles was important as it allowed the team to work more efficiently and produce better results due to each member working on what they we good at, where Tim and Shray looked into the research and design to come up with effective earthquake resistant design, to meet the success criteria, whilst Thenuk focused on evaluating the design and help identify areas of improvement, allowing me to focus on the calculations of our cost and provide feedback whilst I build the structure. We also made sure to work collaboratively, valuing each and every opinions and idea, vowing to give only constructive criticism, to ensure the engineering process goes as smoothly as possible.


Our Task:
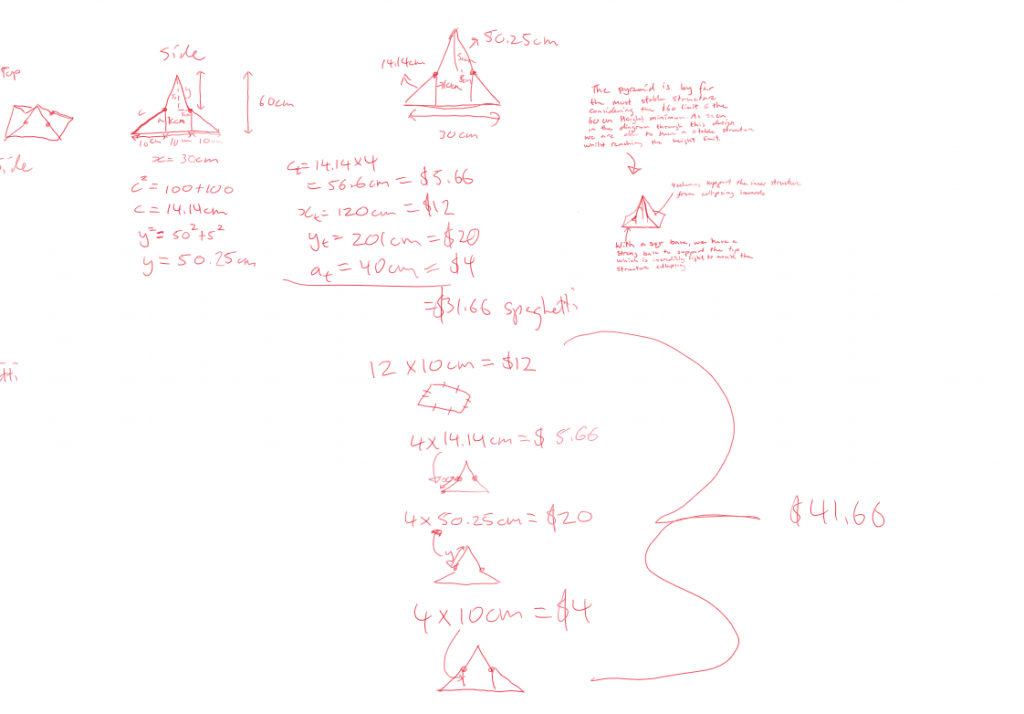
Our challenge was to design and create/build an earthquake resistant building that would hold together in an earthquake simulation. As with any challenge however we were given many limitations. We were limited to a budget of a mere $60 with materials of spaghetti ($1 per 10cm), blu-tack and plasticine ($1 per gram). The design also had to reach a minimum height of 60cm, and a maximum base of 30x30cm which proved to be quite the challenge later in the design process. Our aim was to create a low cost, and effective building frame that will hold together and not collapse during the earthquake simulation.
At this stage my group came together to list possible problems that we may encounter during the project, where we will need to take into issues such as the blu tack not being strong enough to connect the spaghetti together, and how brittle the spaghetti is, making it hard to reach the height limit without going over the budget.

Picture of a Prototype Design 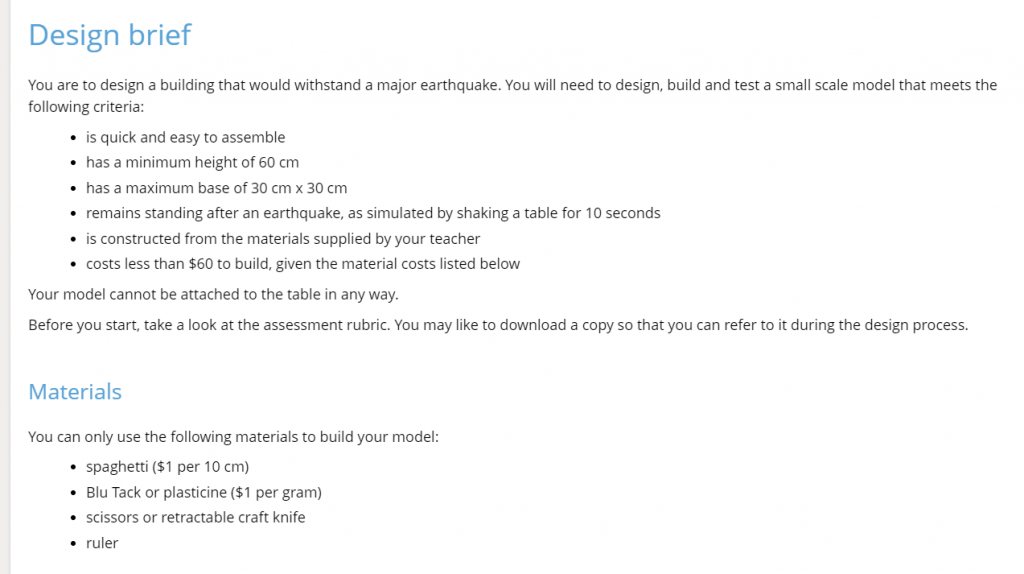
Project Rules
Brainstorm/Research Stage:
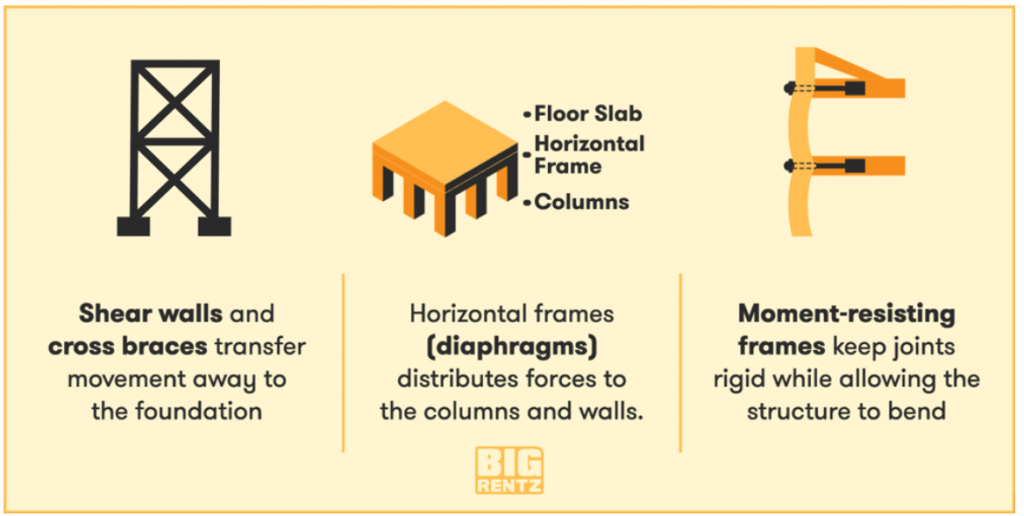
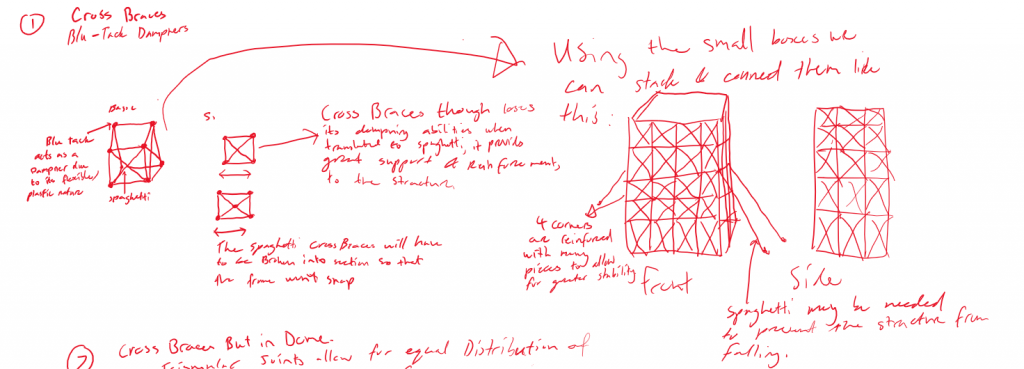
During this stage, we split the group to research different areas to make an earthquake resistant design. The group was split in half where 2 people researched real life methods and techniques to make buildings earthquake proof, and the other 2 researched the reasons for the collapsing of buildings during earthquakes, allowing us to identify the problems that needed to be solved in our design to successfully build an earthquake resistant design. Through this research, will were able to learn many new methods to earthquake proofing buildings, such as the use of cross bracing and dampening to increase stability in the building and absorb the energy/pressure released by the earthquakes vibrations, which is a huge factor in the collapsing of buildings. We also learnt that the triangle was the most structurally stable and strong shape, which helped give us a variety of ideas we could use during the design stage later.
Designing The Structure:
Utilizing the knowledge we gained from our research, we soon began brainstorming and designing our earthquake proof building. To do this, each member began proposing ideas which were then sketched and calculated to see if it was a viable option in which Thenuk, our “Reality Check” made sure to do just that, as I performed my role as the “Calculator” with Shray and Tim coming out with the various designs.
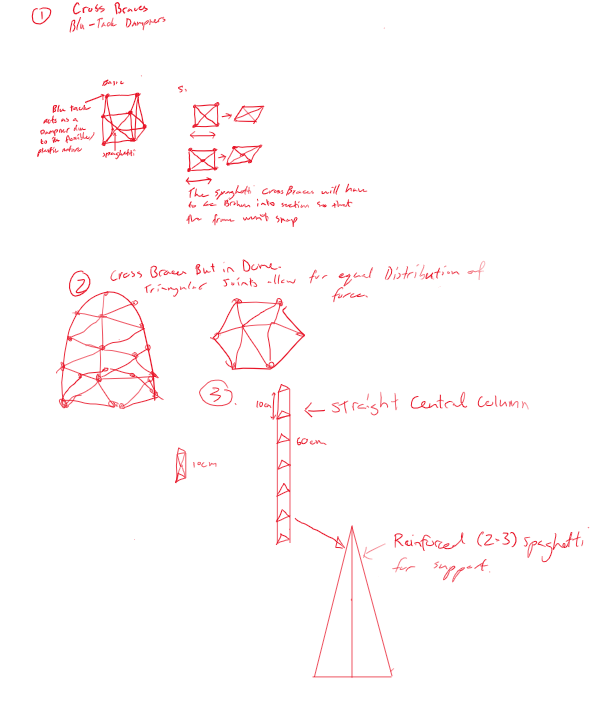
However, as with any challenge, things often don’t go smoothly. We encountered many problems which mainly included, the difficulty in reaching our 60cm height limit whilst keeping within the $60 budget and keeping the structure stable. Initially we came up with many designs, including a dome shaped building which allowed for the equal distribution of force, though that was not practical as it would’ve cost too much. We also tried a traditional rectangular block with cross-braces which were imitated with spaghetti and blutack for the damping effect, though that proved to be over budget as well. After contemplating for way longer than necessary, we finally decided on a caved in pyramid design which was supposed to be stable whilst reaching the height limit, though that will soon be trashed following the initial build process……
Prototype Design sketches
Creation our of Design:
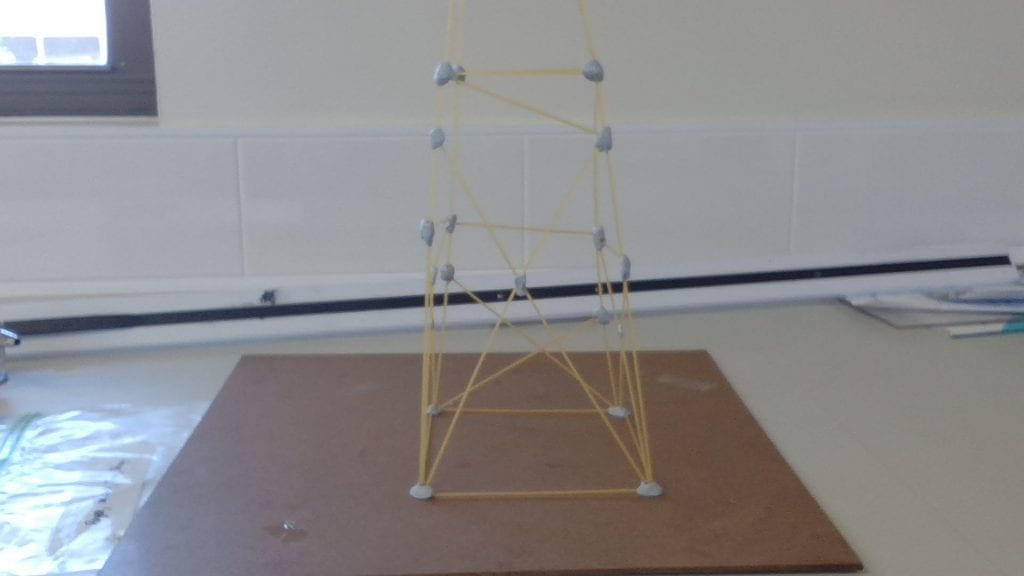
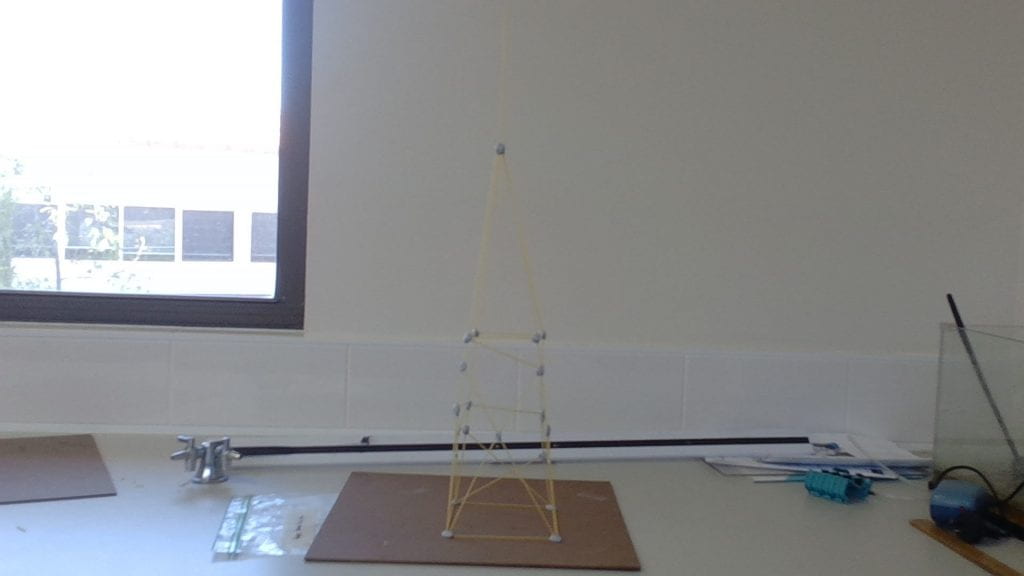
After our heated discussions, we finally came to the creating stage where I put in the work as the builder. With my intricate and stable hands, I was able to build our initial model as shown below in Picture 1, though we soon ran into a problem. There was a miscalculation, where the structure couldn’t reach the 60cm height limit, despite how stable it was. With time running out, we disassembled the structure and turned to our second plan, which was a square based pyramid, which fortunately survived the initial testing with minor issues regarding the build quality. During this, I had 1 team member help me with the actual building and the other 2 doing the other work, needed to be completed, as too many hands would’ve made the process much more complicated and it wasn’t necessary. The new design we created can be seen below as Picture 2, where the pyramid was built with 4 main columns consisting of 2x25cm spaghetti pieces, with a middle rod making up for the lack of height.
Initial Testing:
Finally, we were ready for the initial testing. Using the earthquake simulation, our building was placed onto the simulation as it experienced violent shaking in all directions, up, down, left, right, mimicking the affects of the Primary and Secondary waves and also the affects of the final and most destructive wave, the Surface waves.
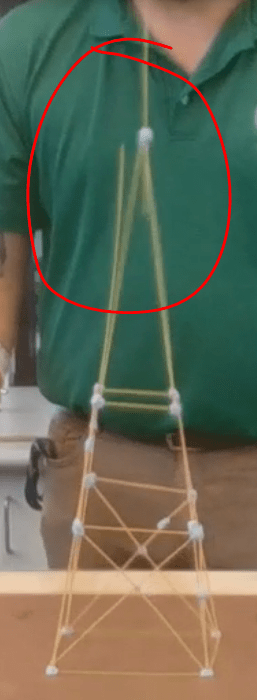
As seen in our testing video, our building was shaking a lot, especially at the top where there lacked any support from the cross bracing. This shaking caused a column at the top to dislocated form the connection, which in the real world would made a huge impact, with the building most likely releasing fallen debris which could damage surrounding areas and people. With this test, were able to focus on specific areas that needed improvement.
Reflecting/Evaluating:

Upon the primary testing, our team focused on the positive and the negatives of our design, where we saw that the pyramid design was a viable option, which only needed to have high support from the cross bracing to increase structural integrity and stability, which could help to avoid the situations where the spaghetti dislocated from their connections. We also faced issues with budget, as the structure had massive consumptions of blutack that came with the amount of connection points present form the X-shaped crossbraces, and our technique of attaching the blu tack.
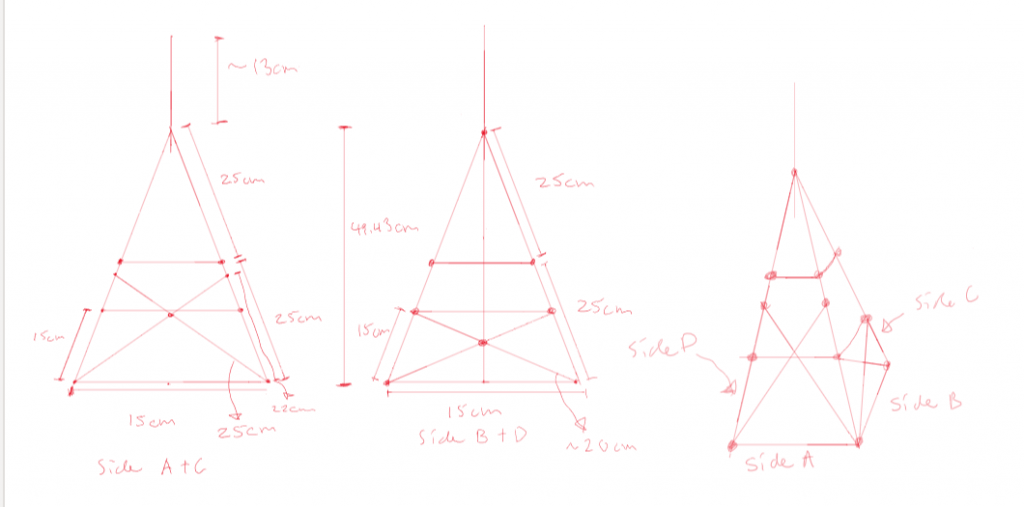
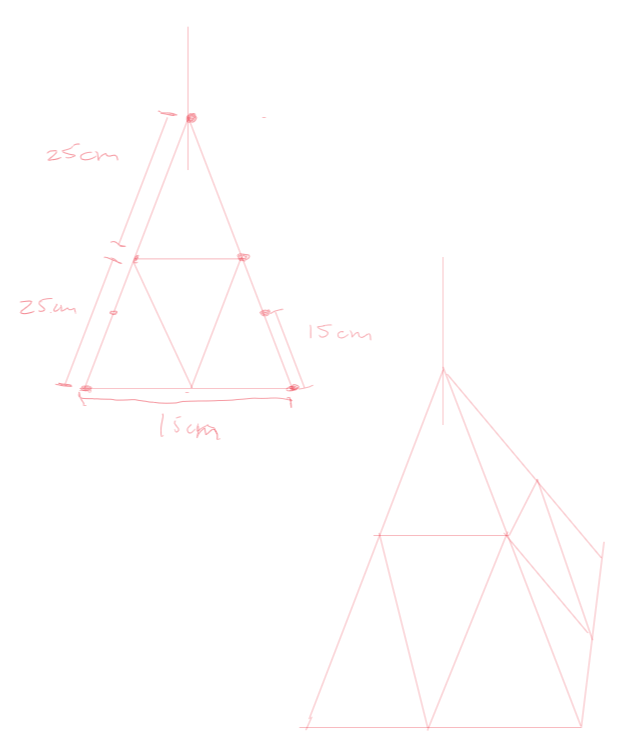
To counteract this issues, we brainstormed ideas overnight, which lead us to our final product. Realising the X-shaped cross braces were the primary offence, we decided to change them to two 25 cm spaghetti shaped into a downwards facing triangle. As we know the triangle is the most structurally stable and strong shape. This feature allows us to remove a majority of the issues with shaking, as first it was connected at a much higher point, allowing it to support the upper connections. And also creating 4 triangles on each face, increasing the structural stability to its max. We also removed unnecessary support from the bottom and utilised a new blutack attachment method to counteract the budget.
Damage Caused by Weak Connection
The new method to attach spaghetti and blutack is by stretching the blutack to a thin sticky tape like shape, then we wrap the blu tack in all directions, allowing for no space between the spaghetti and blu tack, making sure that the spaghetti won’t fall out of shape. This allowed us to save much blutack therefore money as this technique does not need much blu tack.
Now we were ready for the final testing. All our efforts, our blood, sweat, tears, leading to this moment. As seen in the video below, our building survived the catastrophic earthquake, as the build remained stone solid when compared to the original prototype. I held my breath as our building withstood the simulation, where the building remained unscathed even when the simulation was broken.
Our changes had worked! As seen in the video, our building remained rock solid, without any damage, showing how the triangular supports and the higher connection point improved the stability of the build.
Final design Sketches 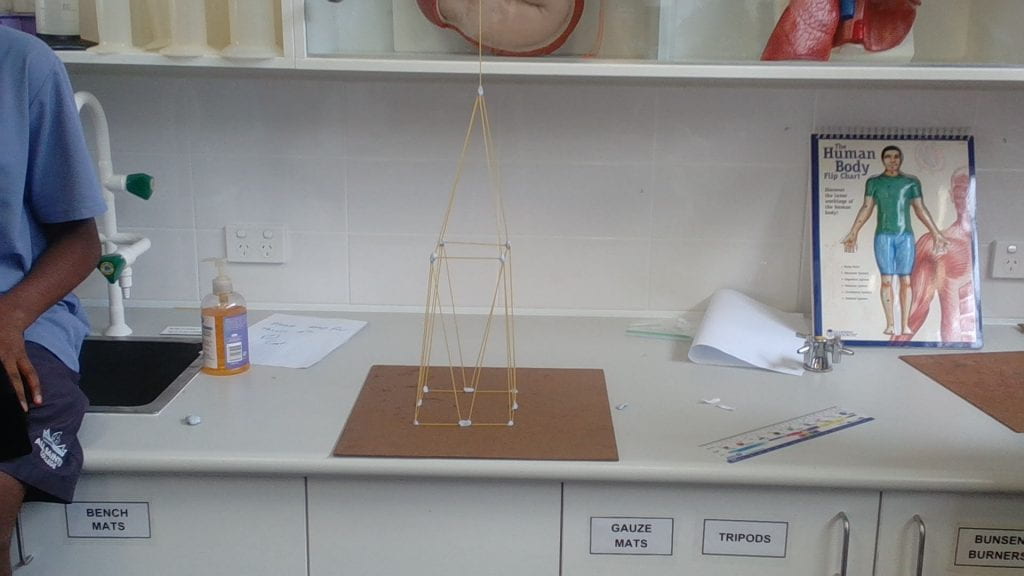
Final Design
Outcome:
Having passed the final test with no damage, I can safely say we have succeeded in building an earthquake resistant building. The use of triangular cross braces and the pyramid design increased the buildings stability and strength to the maximum, with the blu tack allowing for the dampening of force from the earthquake, allowing for our building to survive the test.
Changes:
Looking back however, our building was still quite expensive, as we barely stayed within budget with only ~$1 left. This could’ve been easily changed by changing our square base to a triangular base, as this will completely remove an entire side, drastically reducing cost and allowing for a more compact design, which would be beneficial in the real world where most places are compact, and space is limited. This change should not affect the stability of our building as in theory the triangle is much stronger than a square, though in a vertical sense, as when the shapes are flat, the issue changes entirely, which pushes for an extra test.

Sketch of Potential Changes
Engineering Process (Reflection/Changes):
When focusing on changes to the engineering process, my team found that some processes were unnecessary or were in the wrong order, which slowed down our work speed, namely the brainstorm and research process. We found that the brainstorm should’ve been done as part of the design process as without research, their was no point in coming up with designs at this point as most likely they would flop, as they have no evidence to support their success in resisting an Earthquake. Instead, this process could be replaced with a planning stage where the team comes together to set rules and plan how we would approach the project. This would’ve been a much more effective and time efficient process then the brainstorm as this way, we could better work together in the initial stages of the project as we would’ve had known our standards and expectations and overall improved our efficiency, and allowed for extra time to properly design our buildings in which we could’ve had a more cost effective design.
Reflection (Teamwork):
Reflecting on our term long collaboration, our teamwork has been great. We worked extremely effectively, managing to meet our deadlines proposes by our teacher, whilst displaying our strength, specialising in areas we were strong in. Tim and Shray demonstrated their creativity and research skills through the designing stage, where they came up with many ideas. Thenuk was able to keep our ideas in check, by not making us go too far into a silly idea, befitting the name of “Reality Check”. Finally, I was able to use my mathematical skills and steady hands to build a sturdy structure and calculate our budget quickly. Without the contribution of my team members, the engineering process wouldn’t have went as smoothly as it has. I most likely would’ve been overwhelmed by the work load and found it hard reaching deadlines and coming up with designs, which is a reason why I’m grateful to have such wonderful group members that are so talented in their own fields.
Conclusion:
Overall, this project taught me a lot about the engineering process and effective ways to come up with a design and creating object, as I worked through the Define, Brainstorm, Research, Design, Create, Test and Evaluate engineering process. It was an efficient method of approaching projects which is something I’ll definitely use in the future. This project also helped with my collaboration skills, as it allowed me to better communicate with my peers and get on top of my work, improving my organisational and collaborative skill, making this term incredibly enjoyable and one that I would do again.
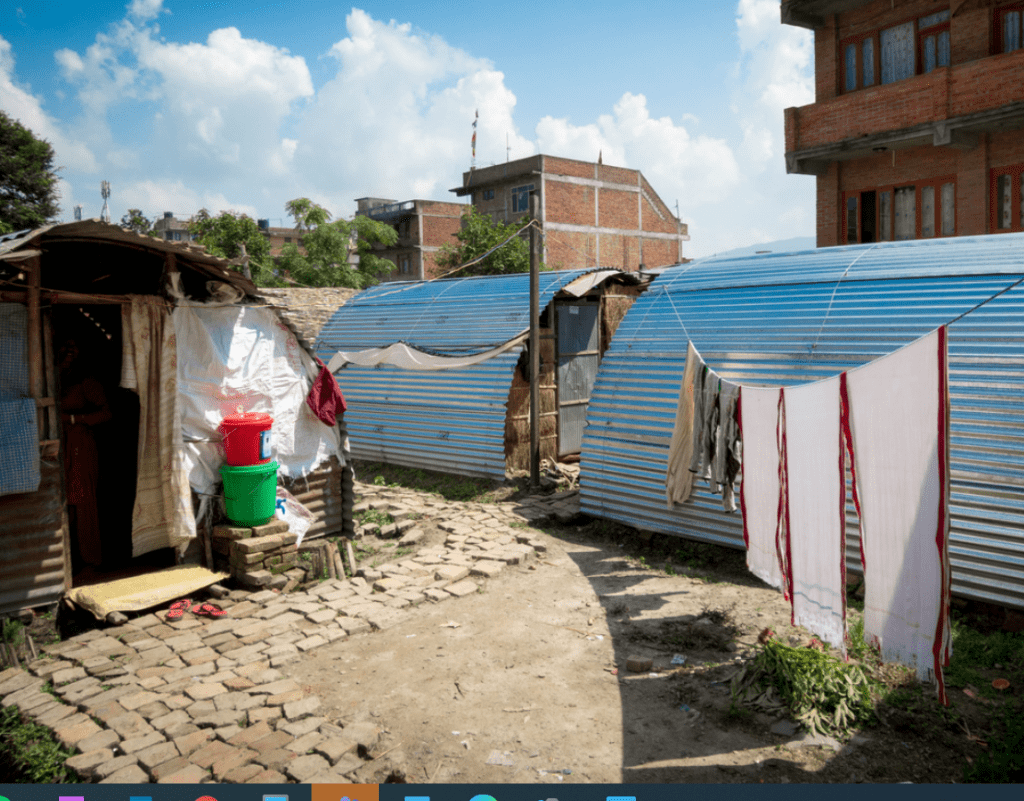
Temporary Shelters in Nepal (Aftermath of Earthquake) 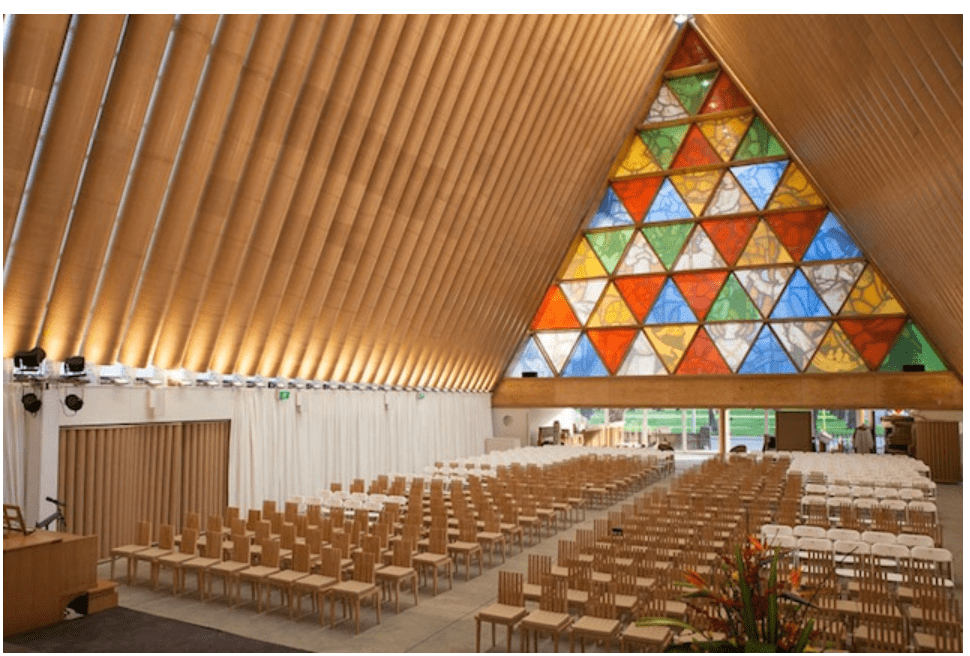
Earthquake Resistant Church Made of Cardboard (New Zealand)