A picture, worth a thousand words. Which means video is, what, priceless?
Uh, What’s Embedding Again?
Embedding allows you to place an actual video that exists on a video streaming website (like YouTube) on a page of your website. So instead of a link, you can watch the video within an article, in a popup window or full screen on your own website – whatever you like.
The ancient text speaks of the days when one had to insert code into your website to link to YouTube. OK, maybe that wasn’t hard but now it’s utterly and disconcertingly EASY.
Another method is to use the embed code
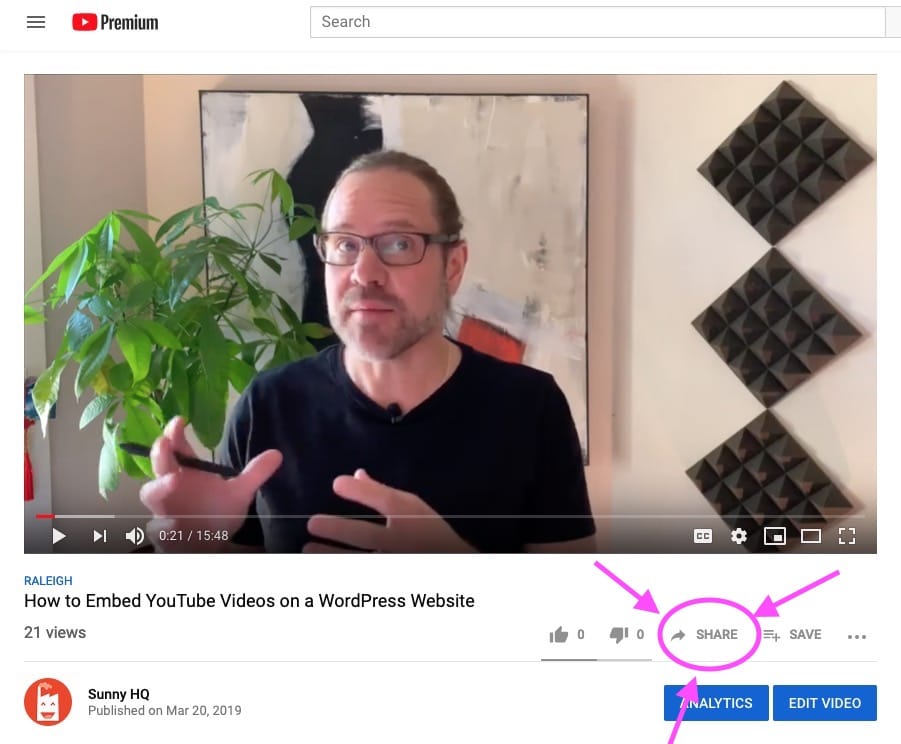
Go to your video on YouTube. Click on the SHARE button (just below the video; it’s got a little arrow near it).
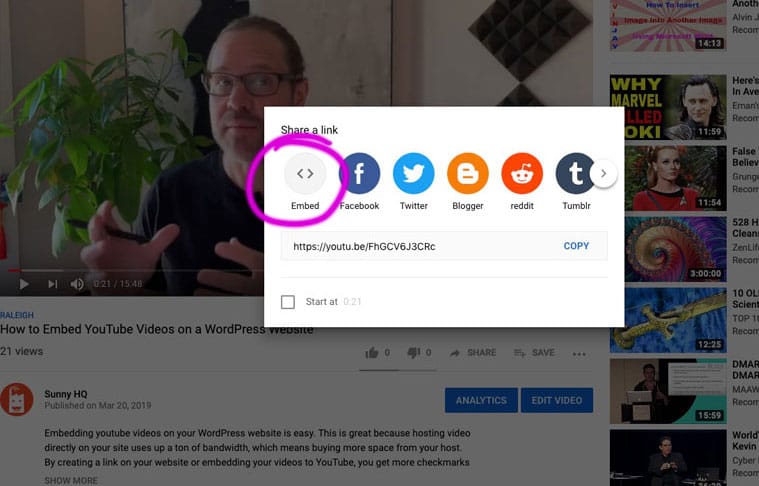
A pop-up menu will give you social-media links and an EMBED <> icon on the left. Click embed!
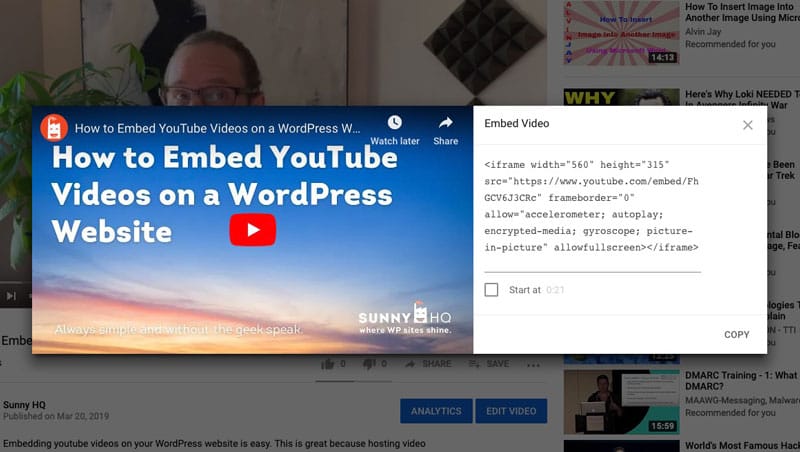
Look below the list. That’s your code, ready for copying onto your site. Click the COPY button, and then head over to your site to place your video embed code.
Different editing modes in WordPress
This is where it can get confusing, but if you embrace this next part, it will serve you whenever working on content. WordPress has two different “modes” of editing—”Visual” and “Text.” It is important for you to use the “text” mode when pasting the new video embed code. If you paste it within the “visual” code window, you’ll see the code displayed on your website instead of the video. Give it a shot and you’ll see what I mean.

Once you have placed the video embed code correctly in the “text” mode editor window you will find by changing to the “visual” editor your video will display a preview (even in the editor.) This is how you’ll know you have done this correctly. Click publish or update and your new video is ready for visitors to click on and enjoy.
Further Customize YouTube Embed Video Options
Let’s take things up a notch or two. Customizing the options of the YouTube video for your website lets you control what users do with it and allows you to more finely tune what you want them to see. Now let’s look at some of the most common options and what they mean. So, go back to YouTube and click on SHARE again.
Next, click on the Embed icon to open a menu. You’ll see four checkbox options (some may already be checked):
- Show suggested video that displays after the video finishes.
- Show player controls, which allows visitors to control video playback and volume.
- Show video title and player actions; currently, this controls the Watch Later and Share functions embedded on the video.
- Enable privacy-enhanced mode, which lets visitors prevent YouTube from storing their information.
A Start At checkbox lets you instruct where you want the video to begin, a useful tool if you want to showcase a particular section.
This is all it takes to embed YouTube videos in your WordPress website.
What about the related videos that show up at the end of a YouTube video?
So you get to the end of the video and up pop a bunch of tiles of videos that are somehow related to yours. Most of the time, even if these are related in some way, don’t support your video, distract the visitor and can even drive them from your site. You can control this (a little) – but even that will help you avoid some bizarre related video showing up…
You have two options to remove the related videos at the end of your YouTube video. The first is by manually adding a little bit of code. To do this simply add ?rel=0 right at the end of the video id code. The “video id” is the string of numbers and letters that follow embed “slash” (/). It is important to know how to identify the video id as it is the key to embedding a video into your WordPress site. See the example below.
<iframe src="https://www.youtube.com/embed/FhGCV6J3CRc?rel=0" width="560" height="315" frameborder="0" allowfullscreen="allowfullscreen"></iframe>/code>
